Soundproofing A Common Wall
Combating sound bleed through a common interior wall is our signature treatment. If you have noise issues between adjoining spaces, rest assured that there are steps you can take to gain more control over the leakage and create sound proof walls. If you need more privacy, more confidentiality, and more peace & quiet, welcome to your solution for soundproofing walls. Regardless of whether you are soundproofing existing walls, remodeling, or wanting to soundproof interior walls under construction, the treatment illustrated below will apply and can combine to produce up to a 90% collapse in noise bleed. Results will vary per application based on leakage, flanking paths, quality of assembly, sound meter accuracy and a host of other components that stretch beyond the control of the layering treatment.
Questions? 1-800-638-9355
How to Soundproof an Existing Wall
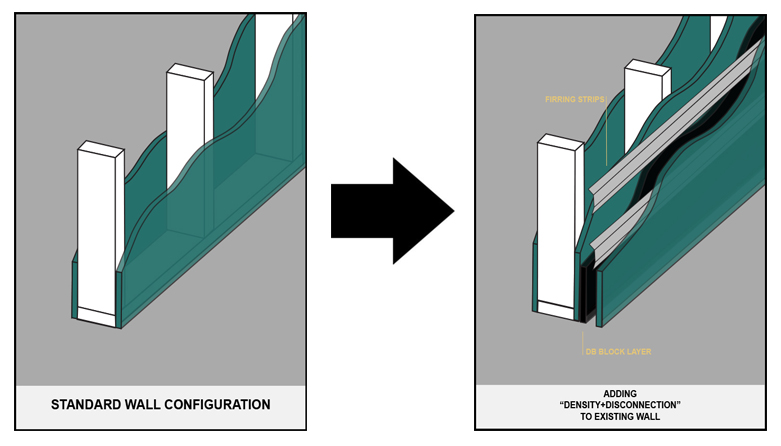
The key to soundproofing your existing wall is a layering system that forces soundwaves & vibrational energy to collapse.
Layer 1 is a limp sheet of dense mass called dB-Bloc. Staple it right to your existing wall ensuring 100% surface coverage.
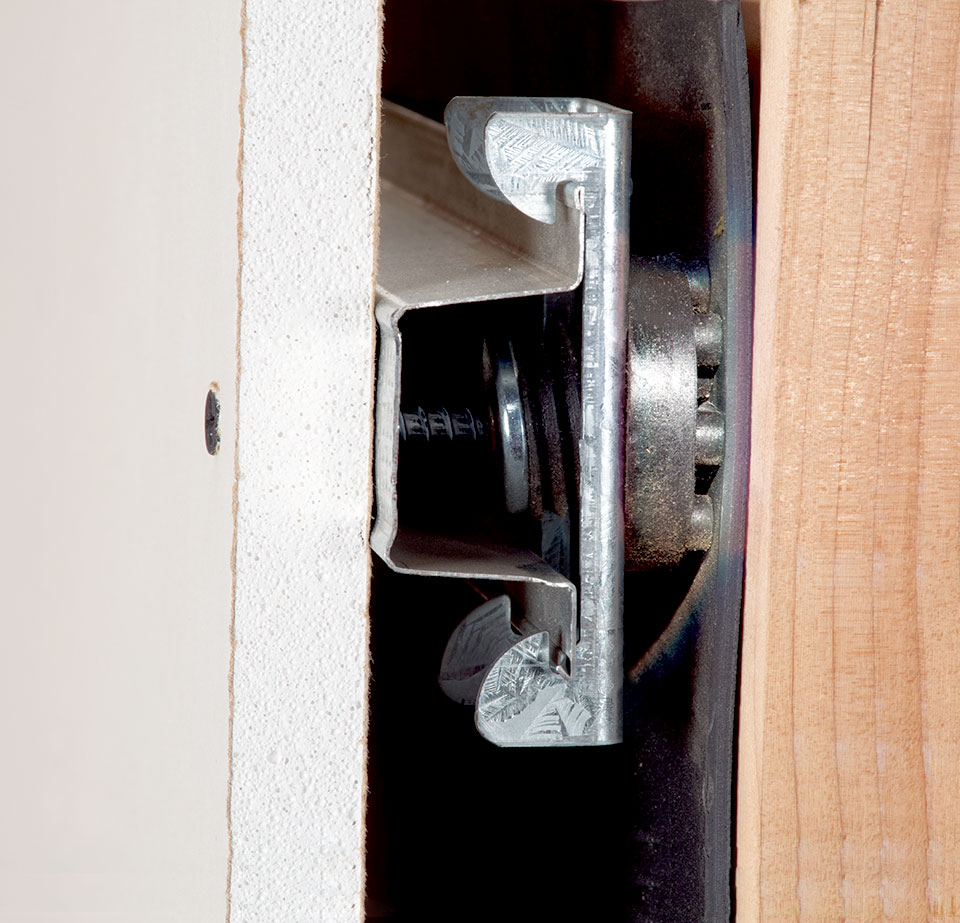
Layer 2 is a set of RSIC Retro Clips and furring channel. The RSIC Retro Clips get screwed to the studs (through the layer of dB-Bloc and your existing drywall) and the furring channel snaps into the RSIC Clips.
Layer 3 is a new layer of 5/8” drywall (preferably Type C) that is attached to the furring channel.
This 3-step layering system will deaden the majority of the noise bleeding through your common wall, resulting in soundproof walls. But again, each treatment represents a unique starting point, with a set of variables that may impact the results. It is important to locate & seal any potential acoustical flanking paths to ensure the highest level of sound attenuation.
Noise Reduction Through Common Wall Assembly
The density of dB-Bloc acts as a sound barrier, blocking most of the soundwaves in the mid to high frequency range. The limp dense mass is able to bleed off sound energy as it vibrates. So rather than the vibrations transferring to the studs and back into sound energy on the other side of the wall, the energy is dissipated by the layer of dB-Bloc.
To address lower frequencies that generate more intense vibrations, the RSIC Clips and hat channel are used to create a disconnection. Think of it as snipping the string pulled tight between two coffee cans. Your existing interior wall has a framework (studs) connecting your rooms together structurally. The frame is your culprit. Having drywall on both sides directly connected to a shared frame allows structure-borne vibrations to pass freely back and forth between your rooms. Your goal is to sever the connection and force the collapse of the transmitting vibrations, which is exactly what the RSIC Clips + Hat Channel achieves through dampening and minimizing contact points.
See dB-Bloc See RSIC Clips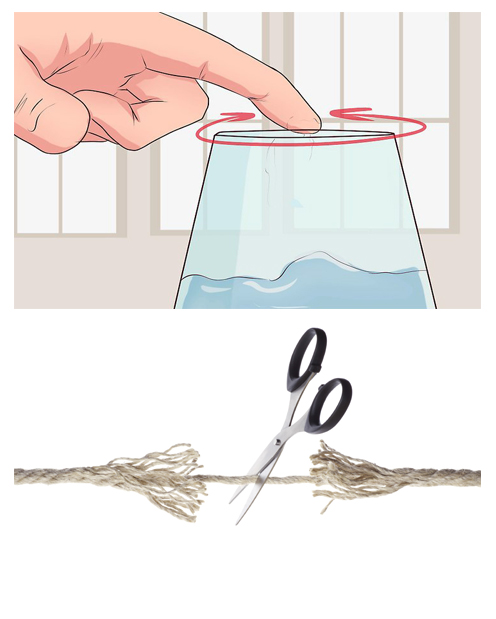
Does Batting Insulation Work For Soundproofing?
Adding batting insulation between the studs only has minimal impact in reducing sound transmission due to the fact that both walls remain structurally connected, which means the assembly is still able to transmit structure-borne vibrations via the shared studs (the primary culprit). In order to successfully soundproof your wall, you need to rely on the “Density + Disconnection” formula. In so doing, you will impede the wall’s ability to conduct structure borne vibrations, and force the collapse of the transmitting sound wave. With that said, adding batting does provide some measure of sound reduction (minimal) by reducing resonance inside the hollow wall cavity, but you cannot rely on this method alone. The dB-Bloc sound barrier treatment adds density to the wall and the RSIC Clips will disconnect it from the studs, allowing you to soundproof walls effectively.
PLEASE NOTE: If you are building a new wall or plan to renovate and start at the studs, you can choose to place the dB-Bloc layer on either side of the studs. Click the link to learn more.
For questions related to the treatment, call our help desk at 1-800-638-9355
See Layering System for New Construction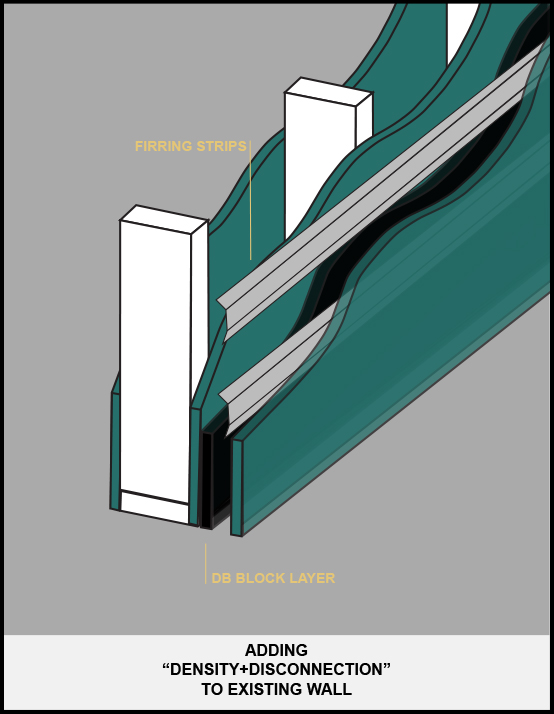
Demo: dB-Bloc + Disconnection:
Common Wall Noise Reduction
dB-Bloc is an ultra thin, ultra dense sound barrier membrane that layers inside a common wall or floor/ceiling assembly to help deaden the transfer of sound through to the adjoining room. The mass loaded vinyl ships to your project site in 54” x 30’ rolls, it measures just .125” thick, but weighs 135 pounds per roll.
1-800-683-9355
See dB-Bloc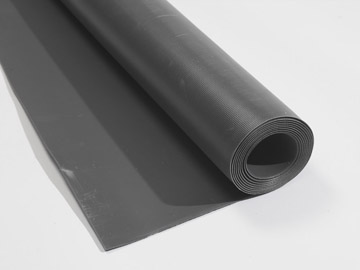
Sound Proof Walls with RSIC Clips
We offer a family of products all related to our dB-Bloc sound barrier membrane. First, consider the RSIC Clip system over standard resilient channels. These clips enhance the process of disconnection once the density of your dB-Bloc is installed. Simply anchor them into your assembly, snap hat channels into then, and then your final layer of drywall as we show here. For portability in your wall soundproofing project, consider our QBS Sound Barrier Blankets that free hang against a wall and have the dB-Bloc membrane lined inside. Finally, for clients seeking a combination of sound deadening through the wall + sound absorption back off the wall, opt for our popular FabricBloc Panels. These are cloth wrapped sound boards with the dB-Bloc once again lined in the middle of the panel.
See RSIC Clips See QBS Blankets
How to Sound Proof a Wall in Three Steps
The answer to blocking noise from bleeding through your common walls is nothing more than a simple layering system. For help in crafting your solution and getting your materials ordered, call our help desk. We ship you the dB-Bloc & the RSIC Clips, and you supply the hat channel and drywall from your local building supply center. Please note that not all sound wave energy is passing straight through your common surface, rendering any layering system susceptible to leakage and a decay in sound values back. Care must be given to isolating the wall and ensuring the noise values aren’t able to bleed through other cavity spaces or connection points including ceiling, floor, electrical outlets, light switches, ductwork, and adjacent non-treated wall surfaces.
1-800-638-9355
1. Density
The mass of dB-Bloc impedes vibrations. The loaded vinyl membrane layer will change the resonant frequency, helping to collapse the soundwave.
2. Disconnect
RSIC Clips combined with resilient channel or hat channel, double walls, or staggered stud walls are all means by which to disconnect your existing wall assembly.
3. Apply Drywall
We recommend a 5/8″ thick gypsum board drywall surface over the standard 1/2″ on your common wall assembly.
Why Clients Love dB-BLoc
dB-Bloc is a stock item that will drop ship to the door step of your project site within days upon order. The rolls will be heavy, weighing in at 135 pounds per roll. For more than 25 years, we have been selling this layering treatment to thousands of satisfied customers who today enjoy a more sound insulated space by having soundproofed walls. The coverage amount is 135 square feet per roll. Each roll measures 54″ x 30′.
Order Online Order by Phone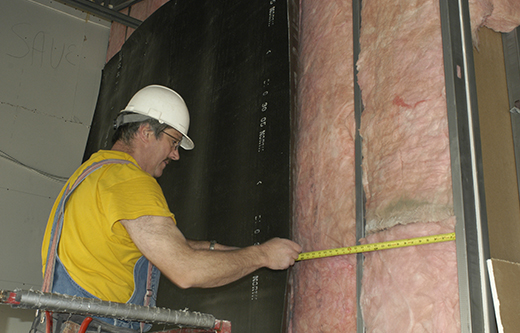
Framing Techniques
Whether your common wall is yet to be built, getting remodeled, or an existing finished surface, there are a variety of methods for breaking the connection between the two adjoining rooms and forcing the collapse of the transmitting sound wave.
Double or staggered stud assemblies are the alternatives if the framing is yet to be built. They are effective, but usually cost more to construct and take up more space. In contrast, adding dB-Bloc + RSIC Clips + 25 gauge furring channel only adds 1-3/4″ to the wall.
Again, adding density & disconnecting your wall will cause the sound wave to decay as it attempts to pass through the assembly. Acoustic flanking can still bleed the noise, so carefully review your starting point and minimize flanking paths that may hinder your results.
1-800-638-9355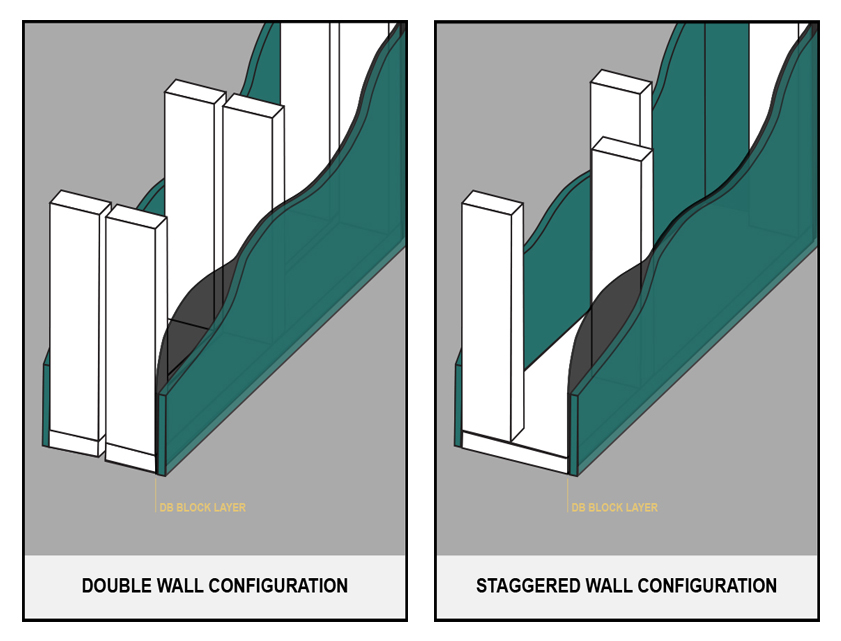
Soundproofing Walls: Q&A
How to Design Soundproof Walls from Scratch
Learning how to soundproof a wall is key. The goal in commercial wall soundproofing is to line the wall with additional density and disconnect the framing structure. This will impede the wall’s ability to transmit structure borne sound waves and thus create sound proof walls. The key component in the assembly is to layer our dB-Bloc sound barrier membrane with the preferred method for wall disconnection.
How to Retrofit the Right Soundproofing Treatment to Existing Walls
Around 95% of our clients start with an existing, finished wall. We instruct them to line the wall with the sound barrier membrane called dB-Bloc, then force a disconnection in the assembly using a hat channel system, and then apply a new layer of 5/8” drywall. The treatment can collapse up to 90% of the sound attempting to bleed through the wall soundproofing treatment.
How to Measure Sound Bleed Through a Common Wall
Sound meters are available for purchase online. Simply test the noise levels in room A, then in room B, and gauge the difference in the sound levels. Should you then decide to pursue your commercial wall soundproofing project, line one side of the finished surface with the dB-Bloc layering system featured on our website.
What Are Flanking Paths?
Flanking paths are the pathways that noise takes to cheat your wall soundproofing treatment. These paths can be airborne or structure borne. Airborne paths include any cutouts in your surface (doors, windows, outlet plates, supply/return vents, etc). Structure borne paths include common contact points such as the joists, studs or cement slabs that connect rooms together. When soundproofing a wall, these flanking paths will combine to lower your overall values. It’s important to learn how to soundproof a wall properly, so you can minimize these flanking paths.
What Is Mass Loaded Vinyl?
Mass loaded vinyl is an ultra-thin, ultra-dense sound barrier membrane that’s layered behind drywall to help deaden the noise that travels through common surfaces. Our brand name for this soundproofing wall product is dB-Bloc.
What Is the Best Way to Block Noise Through a Common Wall?
The goal for successfully treating a common wall is to break the structural connection points between the two rooms and line the assembly with more density. This forces the collapse of the transmitted sound waves and produces a soundproof wall. Density impedes vibration, much like placing the flat of your hand on a tuning fork, and disconnection forces the collapse of the vibrations. Density comes in the form of mass loaded vinyl called dB-Bloc. Disconnection is generated with a set of hat channels that are anchored to the wall. This soundproofing wall assembly can be easily applied to existing wall surfaces.
Why Batting Insulation as Soundproofing Is a Myth, and Why It Doesn’t Soundproof Your Wall
Batting insulation is old school and should not be thought of as insulation protection against sound bleed. This material generates thermal protection from one room to the next, but it lets sound waves bleed right through it. Remember, the primary culprit in common wall noise bleed is the frame that connects the rooms together. Disconnecting the framing and lining the entire wall surface with dB-Bloc forces the collapse of the noise.
How Mass Loaded Vinyl Will Outperform Pre-Engineered Drywall
The goal with any common wall soundproofing effort is to impede the wall’s ability to accept vibrations by adding density to its surface. This is similar to placing your hand on top of a wine glass so it cannot conduct sound after running your finger tip across its top. Pre-engineered drywall has embedded density, and yes, it helps assist in the collapse of transmitted sound waves. What works better is to separate the density from the drywall by placing an air gap between the two mediums. For the bulk of existing common walls and retrofitted treatments, you’ll want to staple mass loaded vinyl to the wall, then a channel system, and then 5/8” standard drywall. Much like layering clothing in cold weather, you’ll want to layer the density in your assembly in the form of pre-engineered drywall.
Why It’s Important to Disconnect Your Wall, and How to Do It
Think of disconnecting your wall like cutting a string that’s pulled tight between two cans. Most walls are built with a single frame that connects two rooms together. By adding a channel system to the finished wall and then adding new drywall over it you have created a break in the connection points. You are forcing the sound waves to collapse within your wall assembly, rather than letting them pass through. Your net result is a soundproof wall.
Why Mass Loaded Vinyl Deadens Sound Bleed
Adding density to your common wall assembly will force the collapse of the wall’s ability to accept and conduct resonance. This is similar to taking the flat of your hand and placing it on the face of a drum or the strings of a guitar. By preventing these objects from vibrating, you kill their ability to conduct a sound wave. The same holds true for how to soundproof a wall. By adding the density of mass loaded vinyl to your common wall surface you force the collapse of the transmitting sound. (See dB-Bloc.)
Does this treatment really work?
The answer is yes, but to what degree. The success of your treatment depends on how much of your energy is already passing through other mediums that the dB-Bloc layering treatment will not address. Attention must be given to the various structure borne or airborne energy paths that the sound waves could use to circumvent your layering treatment. Results will vary for every application.
Contractor's Sign Up

Contractor’s Corner
For contractors in the building trade, interested in the advanced techniques for soundproofing common wall, ceiling and floor surfaces in today’s market, we invite you to sign up for our Contractor’s Corner. This is a free online tool that delivers timely newsletter style messaging to the building trade. For you drywallers, framers, architects and general trade contractors out there, we welcome you to our family of third party sound insulation experts. We look forward to servicing you and your clients with our noise mitigation products and procedures!