Drywall contractors of a certain age and ilk, when asked about the best soundproofing techniques for deadening noise bleed through a common wall, will most likely respond with the age old, go-to, and ultimately incorrect answer: to stuff or blow batting insulation between the studs in the wall. To them, they consider the wall soundproofed.
The reality is, the treatment will block 5-15% of the transmitting noise, if you’re lucky. Is there a better technique? Absolutely. Imagine generating up to a 90% collapse in the same transmitting noise. How to do it?
Let’s start with 2 metaphors.
First, the string pulled tight between two cans. Remember the homemade telephone improvised in your childhood? Yes, that string when pulled tight between two cans, would carry vibrations back and forth, releasing air born sound signals to the other end. Well, the framing inside your wall serves the same function as the string. Your framing is connecting the rooms together and delivering your vibrations back and fort. The sound waves transmit structurally before releasing air born to the other side. So in effect, that batting insulation is actually ignoring the path the energy is traveling, and that’s why the results are so inferior. It isn’t the dead air space between the joists that needs correction, but rather the studs themselves. You need to eliminate the common contact point that connects the rooms together. So imagine taking a scissors and snipping that string between the cans. The telephone game collapses, the connection is broken. The same has to happen with the common wall. Our goal is to disconnect the connection points. Read on to learn how.
The second metaphor? Think of a tuning fork, a wine glass, a guitar string or the face of a drum. Place the flat of your hand on any of these objects, and you kill its ability to vibrate, and the sound dies. Mass impedes vibration. Your wall acts in the same manner. While we don’t expect you to apply the flat of your hand to the common wall to kill the vibration, there is a treatment available that will do the same. It is called mass loaded vinyl. This is a thin, dense membrane that anchors flush to the wall surface and impedes the wall’s ability to resonate.
So now you have the formula for properly treating a common wall for sound bleed: Disconnect the frame and add density to the surface. In so doing, you can knock out up to 90% of the transmitting noise coming straight through the surface.
The procedure.
Step 1: Add your density first. Start with a mass loaded vinyl membrane called dB-Bloc. Cover 100% of your common wall with the material. Whether it’s a finished wall or exposed frame, no matter. Just get the density of this material up, and the wall will be less able to accept vibrations.
Step 2: Add your disconnection. Run a channel system horizontally up the wall with resilient channels, hat channels, furring strips, or other channel systems. Anchor the channels every 24” on center up the wall horizontally. This will create a dead air pocket once your new drywall is applied to the channels, and give the disconnecting vibration somewhere where it can collapse.
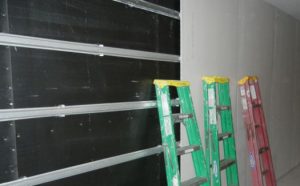
Step 3: New drywall. Anchor 5/8” drywall to the face of the channel and you’ve got it. Wall soundproofing has nothing to do with batting insulation, and everything to do with adding both the “density” of dB-Bloc and the “disconnection” of your channel system. For new build or remodels, you could also create disconnection by double wall or staggered stud framing, and forego the channels.
For questions related to soundproofing your common wall, call the help desk at NetWell Noise Control. 1-800-638-9355. This three step solution to soundproofing your wall is an easy and simple method. It might make a mess for a day or two, but when you’re through, the wall will look like it does not, but the transmitting noise has disappeared.